상단배너1 상단배너2 검색창위배너 검색창아래이벤트배너 좌측고객센터배너 qna게시판 링크 Step1 Step2 Step3 Step4 전기 자동제어 부품 전기 배선 부품 태양광 배전 부품 자가발전 세트 IoT 자동화 소자부품 전선용 마감재 전문관 태양광 모듈 제품 제품용 미니솔라 콘트롤분전반 제작 아크릴박스명판 타공외타공 메탈절곡 아노다이징가공 DIY 구성과정 SMD, 포장, 완제품, 샘플제작 설비 랙, 캐비닛, 콘솔 샘플제작 스타트업주문관 KAKON 스위치 KAKON F.A Panasonic F.A 한국리레이 신화울트론 OTAX DSFOX FORWARD COSMO 세광전자 도원전기 QiAOH C3C HKE BOXCO Autonics 동일전선 우성일렉스 ONPOW 자연에너지 한국리레이 ROCKET PLUG SolarCenter TES YINGDE SOLAR Power Master JINHEUNG ELECTRIC ATLASBX STUDER PM SOLAR CLCDM PCE JSPV 1.DC콘트롤 2.AC콘트롤 1.릴레이/SSR 2.타이머 3.직부등 4.부스바 5.시그널램프 6.손잡이 노브 7.FAN 8.집합표시등 9.슬라이닥스 10.
용

11.케이블그랜드(락커) 12.케이블닥트 13.정전전압기 14.서지보호기 15.LED 표시등 16.전원선&인렛 17.단자대 18.수위조절기 19.온토콘트롤러 20.휴즈홀더/휴즈 21.메타기기 (전류,전압,전력,아워메타) 22.시그널 타워 및 경광등 23.시그널폰/부저 (음성경보기) 24.AC 콘센트, 코드커넥터 1.도어스위치 2.점멸스위치 3.온도스위치 4.메인스위치 5.전원스위치 6.안전스위치 7.유량스위치 8.BOX형 스위치 9.차단스위치 10.압력스위치 11.토클스위치 12.기동용스위치 13.로타리스위치 14.세렉터스위치 15.발판스위치 16.캠 스위치 17.딥 스위치 18.마이크로스위치 19.메탈스위치 20.리미트스위치 21.Φ8,10,12 푸쉬스위치 22.Φ16 푸쉬스위치 23.Φ19,22,25,30 푸쉬스위치 24.락커스위치 1.전선AC브레드코드 (컴퓨터선) 2.저선2선이상 VCTF 3.전선 단선 조작용 KLV 4.전선 옥외노출용 CV 5.전선 5색, 10색 6.전선용 접속콘넥터 7.전선용 접속단자 8.전선용 케이블타이 9.전선용 절연튜브 10.전선용 구별자재 11.가정용 AC멀티탭 12.산업용 소켓, 플러그 1.유니온 전자통신 2.신성계전 3.통신공사 용품전문관 1.배전용파이박스 2.랙,엔클로져 1.작업분 결제 서비스관
today view

0

    prev
    /
    next
    상품번호 : 1036372
    페이스북 트위터 
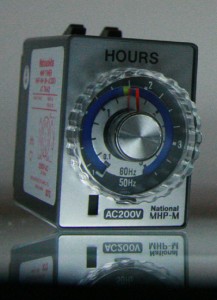
    MHP-NM AC200V
    판매가 18,000
    무이자할부
    무이자할부 카드안내 X
    3~12개월 5만원이상
    3~12개월 5만원이상
    3~12개월 5만원이상
    3~12개월 5만원이상
    3~12개월 5만원이상
    3~12개월 5만원이상
    3~12개월 5만원이상
    3~12개월 5만원이상
    배송 택배 3,500원
    브랜드 Panasonic
    고객평가 0건  ★★★★★ 0/5
    특이사항 3시간
    제조사 PANASONIC
    제조위치 MADE IN JAPAN
    상품옵션 상품옵션을 선택해 주세요
    전압설정
    추가구성 추가구매를 원하시면 선택하세요
    소켓
    총 상품금액 18,000

    COMPACT SIZE
    HIGH PRECISION POWER
    ON-DELAY TIMERS PMH
    Product name Operating voltage


    Cautions For Use

    Timers Cautions for Use (Common for All Models)

    PDF data

    Cautions for circuits

    1.Protective circuit for timer contact

    In the circuit that switches an inductive load, a contact failure may occur at a contact point due to surge or inrush current resulting from that switching.
    Therefore, it is recommended that the following protective circuit be used to protect the contact point.

    Circuit Application Features/Others Device Selection
    AC DC
    CR circuit
    (r: resistor c: capacitor)
    * Note: Available If the load is a relay or solenoid, the release time lengthens.Effective when connected to both contacts if the power supply voltage is 24 or 48 V and the voltage across the load is 100 to 200 V. If the load is a timer, leakage current flows through the CR circuit causing faulty operation.
    Note: If used with AC voltage, be sure the impedance of the load is sufficiently smaller than that of the CR circuit.
    As a guide in selecting r and c,
    c: 0.5 to 1 µF per 1 A contact current
    r: 0.5 to 1 ohm; per 1 V contact voltage
    Values vary depending on the properties of the load and variations in timer characteristics.
    Capacitor c acts to suppress the discharge the moment the contacts open. Resistor r acts to limit the current when the power is turned on the next time. Test to confirm.
    Use a capacitor with a breakdown voltage of 200 to 300 V. Use AC type capacitors (non-polarized) for AC circuits.
    -
    Available Available
    Diode circuit N/A Available The diode connected in parallel causes the energy stored in the coil to flow to the coil in the form of current and dissipates it as joule heat at the resistance component of the inductive load.
    This circuit further delays the release time compared to the CR circuit.(2 to 5 times the release time listed in the catalog)
    Use a diode with a reverse breakdown voltage at least 10 times the circuit voltage and a forward current at least as large as the load current.
    In electronic circuits where the circuit voltages reverse breakdown voltage of about 2 to 3 times the power supply voltage.
    Varistor circuit Available Available Using the rated voltage characteristics of the varistor, this circuit prevents excessively high voltages from being applied across the contacts. This circuit also slightly delays the release time.
    Effective when connected to both contacts if the power supply voltage is 24 or 48 V and the voltage across the load is 100 to 200 V.
    -
    2.Type of Load and Inrush Current

    The type of load and its inrush current characteristics, together with the switching frequency are important factors which cause contact welding. Particularly for loads with inrush currents, measure the steady state current and inrush current and use a relay or magnet switch which provides an ample margin of safety. The table below shows the relationship between typical loads and their inrush currents.

    Type of load Inrush current
    Resistive load Steady state current
    Solenoid load 10 to 20 times the steady state current
    Motor load 5 to 10 times the steady state current
    Incandescent lamp load 10 to 15 times the steady state current
    Mercury lamp load 1 to 3 times the steady state current
    Sodium vapor lamp load 1 to 3 times the steady state current
    Capacitive load 20 to 40 times the steady state current
    Transformer load 5 to 15 times the steady state current

    When you want large load and long life of the timer, do not control the load direct with a timer. When the timer is designed to use a relay or a magnet switch, you can acquire the longer life of the timer.

    3.Connection of input

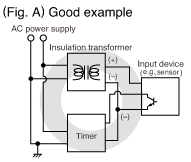
    Since PM4H and LT4H series timers use a transformerless power supply system, the input equipments must have the power supply transformer in which the secondary side is not grounded with the primary and secondary sides insulated, in order to prevent interference of the power supply circuit when connecting the external input circuit as Fig. A.
    Be sure not to use an autotransformer. In case of secondary side grounded or using the autotransformer, this product may be destroyed due to short circuit electrically as Fig. B (1 and 2).
    In case of F.G. terminal of equipments such a PLC grounded in secondary side of the transformer, inner circuits of this product and the input equipment may be destroyed due to short circuit electrically as Fig.B (3).
    Therefore, use the isolated type timers or do not ground F.G. terminal of the products.

    4.Long Continuous Current Flow

    Long continuous current flow through the timer (approx. one month or longer) cause generation of heat internally, which degrade the electronic parts. Use the timer in combination with a relay and avoid long continuous current flow through the timer.

    When using contact output
    When using non-contact output
    5.Leakage current
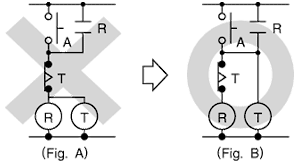
    • 1.For connecting and disconnecting operating voltage to the timer, a circuit should be used, which will prevent the flow of leakage current. For example, a circuit for contact protection as shown in Fig A. will permit leakage current flow through R and C, causing erroneous operation of the timer. Instead, the circuit shown in Fig. B should be used.
    • 2.If the timer is directly switched with a non-contact element, leak current may flow into the timer and cause it to malfunction.
    6.Power off time

    If the operation voltage for the timer is turned ON after the limit time operation is completed or before the limit time is reached, the Power off time longer than the timer restoration time must be secured.

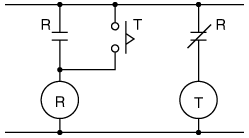
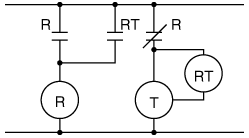
    7.Suicide circuit

    If the timer is restored immediately after the specified time is reached, the circuit must be configured so that the restoration time of the timer can be secured sufficiently.
    If the power circuit for the timer is turned OFF with the timer contact, a suicide circuit may be configured (Fig. A). In order to settle the problem with this potential suicide circuit, the circuit must be designed so that the timer is turned OFF after the self-retention circuit is completely released (Fig. B).

    8.Electrical life

    The electrical life varies depending on the load type, the switching phase, and the ambient atmosphere. In particular, the following cases require careful attention:

    • 1.If an AC load is switched in synchronized phases:Locking or welding is liable to occur due to contact transposition. Check this with the actual system.
    • 2.If a load is switched very frequently:
      If a load which generates arcs when a contact is switched is turned ON and OFF very frequently, nitrogen and oxygen in air are combined due to arc energy and then HNO3 is produced. This may corrode metallic materials.

    The effective countermeasures include:

    • 1.Using an arc-extinguishing circuit;
    • 2.Decreasing the switching frequency; and
    • 3.Decreasing the humidity in the ambient atmosphere.
    9.Pin connections

    Correctly connect the pins while seeing the pin layout/connection diagram. In particular, the DC type, which has polarities, does not operate with the polarities connected reverse. Any incorrect connection can cause abnormal heating or ignition.

    10.Connection to operation power supply
    • 1.Supply voltage must be applied at a time through a switch, a relay, and other parts. If the voltage is applied gradually, the specified time may be reached regardless of its value or the power supply may not be reset.
    • 2.The operation voltage for the DC type must be at the specified ripple percentage or less. The average voltage must fall within the allowable operation voltage range.
      Rectification type Ripple percentage
      Single-phase, full-wave Approx. 48%
      Three-phase, full-wave Approx. 4%
      Three-phase, half-wave Approx. 17%
    • 3.Make sure that no induced voltage and residual voltage are applied between the power pins on the timer after the power switch is turned OFF.
    11.Control output
    • 1.The load for the control output must be used within the load capacity specified in the rated control capacity. If it is used exceeding the rated value, the life is greatly shortened.
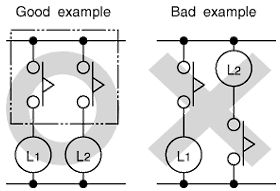
    • 2.The following connection might result in short circuit between the heteropolar contacts in the timer.
    12.Installing the timer
    • 1.To install the timer, use the dedicated pin bracket or socket (cap). Avoid connecting the pins on the timer by directly soldering them.
    • 2.In order to maintain the characteristics, do not remove the timer cover (case).
    13.Superimposed surge of power supply

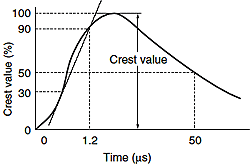
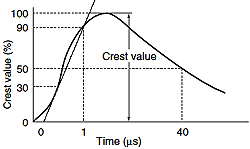
    For the superimposed surge of power supply, the standard waveform (±1.2×50μs or ±1×40μs) is taken as the standard value for surge-proof voltage.
    (The positive and negative voltages are applied each three or five times between the power pins.) For the standard values for the PM4H, LT4H, and S1DX type timers, see the respective items in "Caution on usage."

    Single-pole, full-wave voltage for surge waveform[±(1.2×50)μs]
    Single-pole, full-wave voltage for surge waveform[±(1×40)μs]

    PMH [±(1×40)μs]

    Voltage type Surge voltage
    AC type (except 24V AC) 4,000V
    12V, 24V DC, 24V AC 500V

    Other timers [±(1×40)μs]

    Type Surge voltage
    PNS CN-C CHP, CHP-F 20 times rated voltage
    CHP-SD 4,000V

    If external surge occurs exceeding the specified value, the internal circuit may break down. In this case, use a surge absorption element. The typical surge absorption elements include a varistor, a capacitor, and a diode. If a surge absorption element is used, use an oscilloscope to see whether or not the foreign surge exceeding the specified value appears.

    14.Changing the set time

    Do not change the set time when the limit time operation is in progress.
    However, this is possible only with the motor-driven type timer if the set time is shorter than the remaining time. For changing the set time on the digital timer (LT4H), see the relevant item in "Caution on use."

    15.Operating environment
    • 1.Use the timer within the ambient temperature range from -10°C to +50°C/ +14°F to +122°F (+55°C/ +131°F for the LT4H series) and at ambient humidity of 85% RH maximum.
    • 2.Avoid using the timer in a location where (a) inflammable or corrosive gas is generated, (b) the timer is exposed to much dust and other foreign matter; (c) water or oil is splashed on the timer; or (d) vibrations or shocks are given to the timer.
    • 3.The timer cover (case), the knobs, and the dials are made of polycarbonated resin. Therefore, prevent the timer from being exposed to organic solvents such as methyl alcohol, benzine, and thinner, strong acid substances such as caustic soda, and ammonia and avoid using the timer in atmosphere containing any of those substances.
    • 4.If the timer is used where noises are emitted frequently, separate the input signal elements (such as a sensor), the wiring for the input signal line, and the timer as far as possible from the noise source and the high power line containing noises.
    16.Checking the actual load

    In order to increase the reliability in the actual use, check the quality of the timer in the actual usage.

    17.Others
    • 1. If the timer is used exceeding the ratings (operation voltage and control capacity), the contact life, or any other specified limit, abnormal heat, smoke, or ignition may occur.
    • 2. If any malfunction of the timer is likely to affect human life and properties, give allowance to the rated values and performance values. In addition, take appropriate safety measures such as a duplex circuit from the viewpoint of product liabilities.

    PM4H Series Cautions For Use

    PDF data

    1.Input connections (PM4H-A type)

    • 1.Be sure not to use terminal (10) as the common terminal of the input signal as shown in Fig. A. Otherwise, the internal circuit of the timer may be damaged. Use terminal (2) as the common terminal as shown in Fig. B.

      If the circuits is connected as in Fig. C,the internal circuits must be broken. Be sure to connect the circuit as in Fig. D.

    • 2.When one input signal is simultaneously applied to more than one timer, be sure to avoid the wiring shown in Fig. E.Otherwise, the short-circuit current will flow and cause damage. Be sure to align the polarity of the power supply as shown in Fig. F.
    • 3.Terminal (2)-(6) (screw terminal [2]-[3]) should be connected as the start input. Connect terminals (2)-(7) (screw terminal [2]-[4]) for reset signal input. Connect terminals (2)-(5) (screw terminal [2]-[5]) for stop signal input. Be sure not to connect with other terminals and apply excessive voltage. The internal circuit will be damaged.
    • 4.The input wiring other than the power supply circuit should avoid these conditions,high-voltage wiring and parallel wiring with power wire. Wire in short with using the shielding wire or metal wiring tube.
    • 5.For start, reset and stop input, use gold-plated contact with high reliability. Since contact bouncing causes errors in the start, use an input contact less bounce time.
    • 6.Keep the minimum signal input times over 0.05s.

    2.Input signal conditions(PM4H-A type)

    • 1.Connection of contact input (Pin type example)

    Use gold-plated contacts with high-reliability. The bounce time at the contacts causes errors in the timer operation time. Accordingly, use start input contact whose bounce time is short. The resistance when shorted should be less than 1kohm;, and when open resistance should be more than 100kohm. For the screw terminal type, connect the terminal [2] to the each input signal.

    • 2.Connection of contact input (Pin type example)

    Apply the open-collector connection. The characteristics of the transistor used must be VCEO=10V or more, IC=10mA or more, and ICBO=6µA or less. Additionally, the input impedance must be 1kohm; or less, and the residual voltage must be 0.6V or less. For the screw terminal type, connect the terminal [2] to the each input signal.

    • 3.Connection of non-contact input (Pin type example)(voltage input)

    Even if the open collector is not used, input is also possible from the non-contact circuit of 6 to 30V DC. In this case, the start input is turned on when the signal is turned from H to L. The residual voltage must be 0.6V or less when Q is on. On the AC type, an insulated transformer is required as the power supply for the photoelectric sensor, etc. (power supply for the input devices).

    Keep the minimum input signal time of each signal to 0.05s or more.

    3.Checking the contacts before use (PM4H-F only)

    When the power ON time is less than the minimum power application time, the contacts may remain in an ON state, so the state of the contacts should be checked before use. When the contacts are in an ON state, activating them once will return them to their normal state (the OFF state after time-out). (Be aware that relay characteristics may result in the contacts being in that same ON state if exposed to excessive vibration and impact during transport.)

    4.Time setting

    To set the time, turn the set dial to a desired time within the range. Instantaneous output will be on when the dial is set to "0". When the instantaneous output is used, the dial should be set under "0" range.(Instantaneous output area)

    Note) When power supply is on, the time range, setting time and operation mode cannot be changed. Turn off the power supply or a reset signal is applied to set the new operation mode.If the position is not stable, the timer might mis-operate.

    5.Superimposed surge of power supply (PM4H series common)

    For the superimposed surge of power supply, the standard waveform is taken as the standard value for surge-proof voltage. If external surge occurs exceeding the specified value, the internal circuit may break down. In this case, use a surge absorption element.

    Operating voltage Surge voltage(peak value)
    100 to 240V AC
    100 to 120V AC
    200 to 240V AC
    48 to 125V DC
    4,000V
    12V DC, 24V DC
    24V AC/DC
    500V

    The positive and negative voltages are applied each five times between the power pins. The typical surge absorption elements include a varistor, a capacitor, and a diode. If a surge absorption element is used, use an oscilloscope to see whether or not the foreign surge exceeding the specified value appears.

    6.Acquisition of CE marking

    Please abide by the conditions below when using in applications that comply with EN61812-1.

    1.Overvoltage category III, pollution level 2
    2.This timer employs a power supply without a transformer, so the power and input signal terminals are not insulated.
    • 1.When a sensor is connected to the input circuit, install double insulation on the sensor side.
    • 2.In the case of contact input, use dualinsulated relays, etc.
    3.The load connected to the output contact should have basic insulation.

    This timer is protected with basic insulation and can be double-insulated to meet EN/IEC requirements by using basic insulation on the load.

    4.Please use a power supply that is protected by an overcurrent protection device which complies with he EN/IEC standard (example: 250 V 1 A fuse, etc.).
    5.You must use a terminal socket or socket for the installation. Do not touch the terminals or other parts of the timer when it is powered. When installing or un-installing, make sure that no voltage is being applied to any of the terminals.
    6.Do not use this timer as a safety circuit. For example when using a timer in a heater circuit, etc., provide a protection circuit on the machine side.


    Return to top

    Download


    • CAD
    • Catalog
    • Manual
    • Software

    Get Support


    • Contact Us by Email
    • Sales
    • FAQ

    Return to top


    WWW
    http://hanelecon.com/

    community board

    회사명 : 한텍 / 사업장소재지 : 서울특별시 종로구 인의동 112-2 세운스퀘어 별관 2층 222호 / 대표자 : 한영수
    고객만족센터 : 02-2269-1877 / FAX : 02-2269-0310 / E-MAIL :(hanelecon@hanelecon.com)
    사업자등록번호: 101-03-86433 [사업자정보확인] / 통신판매업신고: 제2016-서울종로-0718호 / 개인정보책임자: 김도현(hanelecon@hanelecon.com)

    Copyright by 한텍 All rights reserved. www.morenvy.com
    kcp 에스크로
    회원님의 소중한 개인정보 보호를 위해 비밀번호를 주기적으로 변경하시는 것이 좋습니다.
    현재 비밀번호
    신규 비밀번호
    신규 비밀번호 확인
    6~20자, 영문 대소문자 또는 숫자 특수문자 중 2가지 이상 조합